Garment Sewing Class: We are doing collars and collar stands in the Garment Making class. I spent the morning making samples for each student with upper collar, under collar and collar stand. It is a great group of students. They will get to learn Pam Erny's turning the point technique and Margaret Islander's burrito technique.
Today I received my 100% cotton Bare Knits from Nancy's Notions. I am excited to get started sewing each piece. The feel and look really great. The weight is nice and they are opaque. I have been very disappointed with the knits and jerseys that I have purchased from cheap online vendors. They look good on the computer, some die in the wash, most start to pill immediately. I sew things that I want to wear and that work with my other wardrobe. It makes me really unhappy when they become rags after 3 washings and have to be thrown away. I have high expectations for these knit pieces. Stay tuned.
Now I have made the Bare Knits top. I have washed it a few times and it is holding up really well. This fabric is not shown in the current catalog but is available on Nancy's Notions website.
Wednesday, September 14, 2016

My successful sewing with a plan Finally
WARDROBE FOR TRAVEL OR LIFE
Last October I agreed to do a program for Sew Fitting, a neighborhood group of the Atlanta Chapter of the America Sewing Guild.
It took several months and false starts to find the right print fabric for the project. I planned to use the print in several garments, a dress, top, jacket and culottes of slacks. I would use some solid that appeared in the print to make other jackets, tops and slacks. Since I started with a print instead of a "neutral" (ugly) I will have ten pieces that play nice together. From those ten pieces I will have many many outfits. The photos will be posted this weekend when my photographer is available.
Wardrobe
for travel or life
The
Inspiration: I found that many
small collections of a dozen or so garments are presented at the time
of fashion week. I became intrigued with the fact that there were 2
or three principal fabrics that were used in several different
garments. That was the inspiration that started the process.
The Process:
I began looking for the
feature fabric as soon as I agreed to present the program. That was
a long journey. I wanted 10 yards of a cotton sateen print. I
found a few that had the wrong colors or a mix that did not appeal to
me. I found something that might work on Craftsy. They only sell 4
yard pieces. So I was off searching for other sources.
I
finally found the piece on Gorgeous Fabrics. I wanted to get a
swatch but they only had 19 yards. Likely by the time I got the
swatch the piece would be gone. I ordered 8 yards. It was a border
print with the white down the middle. This presented some design
challenges.
I
drafted two dress patterns, three top patterns and I am working on
the jacket pattern from my master patterns. I made samples/muslins
of each pattern and tweaked them a few times. The jacket will be
done shortly but I want to make a sample before I make it in the
feature fabric.
Designers
take all year to work on two collections. I have a much greater
appreciation for the process. My work was based on design for fit
and esthetics of how it looked on my body. I have some more ideas in
mind that will use bits from the fabric in other garments.
I
have assembled many groups of fabric for making swaps. I never got
beyond the first pair of pants or top. There were always pieces that
worked but did not inspire me. I really like to idea of using a
focus fabric that I really love and building around that. Boo to all
those who say start with a (ugly or uninspiring) neutral.
I
have found that most of my red family fabrics work with this piece.
I will be making a red wool crepe jacket, red wool pants from Vogue
fabric that was too light to become a jacket and black tropical
weight wool pants. I have a deep pink jacket made from a Caroline Rose piece at Gail K Fabrics. This was an orphan but now works well with this print dress and top.
Thursday, August 16, 2012
Developing Master Pattern: Ruched side front
The photo of the half scale demonstrates how to slash and spread your side front princess pattern to get the ruching.
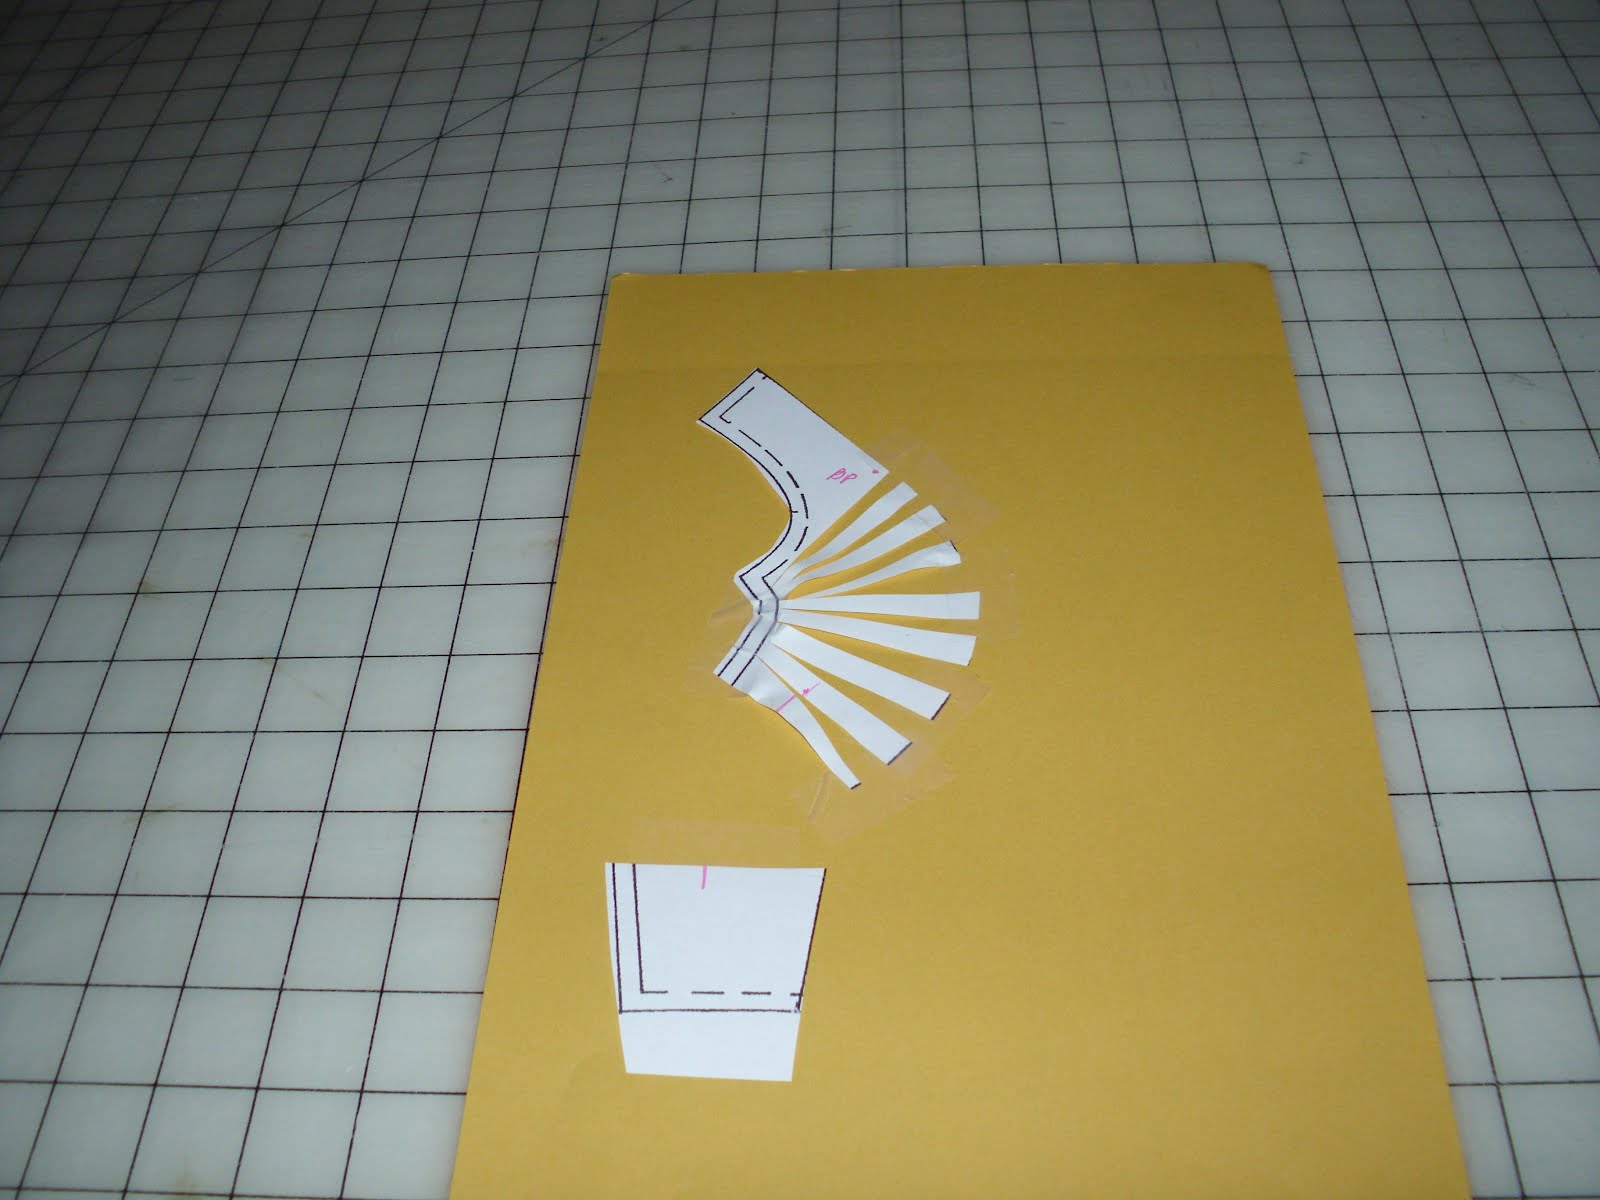


ruched side front on shoulder seam princess dress
In our Master Pattern class yesterday Geannene had a pattern for a dress with a ruched side front. My recommendation is that Geannene use her side front and slash and spread to achieve the same result. I have used the half scale bodice and cut it to make it a shoulder seam princess line. I made several cuts to but not through the side seam and pulled the inside seam line apart to form a curve. This is how the ruched side front pattern was made. I have attached a scan of the piece that I made.
Geannene, I recommend that you do this rather than trying to fit the other pattern. The more cuts that you make and spread the more curve you will get and the more ruching you will have. The general principal for gathers, ruffles and ruching is a ratio of 1 1/2 to 1. In other words if the part of your pattern that you want to ruch is 6 inches you may want to start with the circumference of the curved part at 9 inches. You can check the pattern that you brought today and measure the front piece where the ruching is eased into on the front and measure the ruching circle. This will give you the ratio that the pattern company used. I would then use this ratio on your top as well.
You all are the designers now and can make details or add details..I am impressed with the work that you all have done and the progress that you have made. I will look at my several pattern drafting books to recommend some that show how to draft details like collars, ruching, necklines, yokes, etc. Connie Crawfords book is good and so is Helen Joseph Armstrong. There are several less technical books on the market to and I will look through my collection to see which I have and you can take a look at them.
Wednesday, August 8, 2012
Get Fitted: Blouse or Top Sloper Instructions
Sloper Instructions
It is essential to mark and sew accurately to get an acceptable fit. This is a procedure to get the sloper well fitted. Be cautious not to over fit. You are not a statue. Movement, posture, fatigue, rest, shoes and under garments can all impact the fit. The sloper pattern must at least equal your full circumference at the fullest part of your body.
I recommend Connie Crawford blouse fitting pattern number 1201. It is available on
her website: www.fashionpatterns.com. It comes in 2 groups of missy sizes and 2
groups of plus sizes that correspond to bra cup sizes. Choose the pattern that includes your size and your bra cup size. Another advantage is that it is not just a bodice but goes down to the hip level.
Measure all the way around your body at the fullest part of your bust. Write this number down here: (a)________________ Measure across the front of your body across the fullest part of your bust from side seam to side seam. Write this number here:
(b)__________ Divide this number by 2. Write this number here: (c)____________.
Choose a pattern size that is equal to your side seam to side seam measurements across the fullest part of your bust. Measure the pattern pieces to determine the width across the bust. Write that number here: (d) _____________ On the pattern mark the seam line on the side seam at the bust line and measure from there to the center front line. This number is 1/2 of the distance across the front from side seam to side seam and should equal the number (c). (d) should equal (c). Now subtract (b)
from (a). Write this number here (e) __________. This will be your back
measurement. Divide this number by 2. Write that number here: (f)______________.
Measure the back pattern piece at the line that corresponds to where you took the full body measurement. Write that number here (g)____________. This should equal (f). cut a center back seam as this will be needed in the fitting the upper back.
If you have a very full bust or a muscular and wide back it is possible that you will need different sized front and back pieces. Please let me know and I will advise you
regarding the armscye and sleeve. You will cut the larger armscye on the larger piece
and the smaller armscye on the smaller piece. You will cut the sleeve corresponding to the size that you cut on each piece and blend the sleeve at the top of the sleeve cap.
Sewing the muslin sloper
The muslin must be sewn accurately to determine the fit. Press your muslin fabric prior to cutting. The next step is to mark all seamlines on your muslin pieces. Staystitch the neckline, shoulders and the armscyes. Stitch from the wide to the narrow so that you can cause minimum stretching of these seam lines. Press the staystitched muslin pieces. Then compare the neckline, shoulder and armscye with the pattern to determine if there is any distortion. If so correct it by steaming the piece back into shape or marking the correct seamline onto the pieces so it can be sewn accurately. After stitching the seams press them flat then open. Cut 2 inch seam allowances on the shoulders. Stitch these on the outside. You will be stitching wrong sides together at the shoulders. Cut one inch seam allowances on all other seams. If using Connie's pattern cut as shown on the pattern pieces. Set both sleeves as you would in a garment. Add a center front zipper.
It is possible that you will need an upper back adjustment which is then made from the stitched muslin. This adjustment may require the assistance of a sewing friend. If the back neckline does not sit at the base of the neck slash 1 inch from neck seamline from center back to but not through the back armscye seam. The muslin fabric will spread the amount needed. Measure this at center back and over the shoulder blades. On the paper pattern make slashes every 1/4 inch and spread 1/8 to 1/4 inch until you have added the full amount needed from the muslin.
Sunday, July 8, 2012
Developing Master Patterns supplies list
Supplies needed:
24 inch by 30 yards architects “trash” paper, several very sharp number 2 pencils,
plastic see through dressmaker curve (available from Peggy Sagers ot Dritz), 18” or 24”
flexible ruler, L-square or T-square, hip rule is not imperative but very useful, enough “muslin” yardage to make your garment twice. (Muslin is for class 101).
Large 3 ring binder for notes and records of each garment.
The goal is that you will have several completed garments that fit. Most importantly, that you will acquire the knowledge, information and confidence to analyze patterns and use your own master patterns to achieve perfect fit and/or add the details to your own master patterns.
Developing Master Patterns Elements of Design Part 2
PART 2 MORE (advanced) DESIGN
Part 3.5 Copying details
Part 3.6 Adding details
Part 3.8 Moving darts
Part 3.9 The elements of your personal preference
Part 3.10 Adding construction details
Developing Master Patterns Elements of Design Part 1
PART I ELEMENTS OF DESIGN
Part 3.1 Design analysis and comparing patterns
Part 3.2 Incorporating design details
Part 3.3 Necklines
Part 3..4 Fronts
Developing Master Patterns Class 202
Developing master patterns or slopers from your fitted top or blouse.
Part 2.1: Tweaking and making pattern changes.
Making and using templates.
Part 2.2: Developing other master patterns from the fitted final pattern above.
Part 2.3 Developing and adjusting the sleeves:
Part 2.4 Developing basic patterns to your personal preference.
Developing Master Patterns Fitting Class 101
Pattern Fitting and Tweaking Program for tops and blouses
Use your tried and true pattern or start with a new basic pattern*
Lesson 1: Complete and accurate measurements.
Pattern analysis and comparing your measurements to pattern
measurements
Lesson 2: Pattern revisions for your body.
Lesson 3: Finish sewing muslin garment, noting any fitting tweak.
Note: Prior to beginning this I strongly recommend that you invest in a well fitting bra.
Anne St Claire at Needle Nook Fabrics has info on what makes a well fitting bra in her
book Intimately Yours, Bras That Fit. Her contact is ndlnookfab@aol.com. You could
also have a commercial bra professionally fitted.
*Contact instructor regarding pattern selection.
Working hard on fitting
The Developing Master Patterns class has been working hard on preparations. We have been fitting. We have found good success with Connie Crawford's new bust dart blouse fitting pattern (available from her website: fashionpatterns.com). It has been formulated on a more realistic view of the human body than the "B-Cup Barbie-esque" view of some other patterns. Fitting is a process that has to be worked through. It starts at the top and then when one change is made it can require other changes as well. If you are doing your own sloper without a helper be sure to cut, mark and stitch accurately. Be sure to stay stitch following the grainline around the curved edges that you do not want to ease. A tip from Cynthia Guffey is to staystitch 1/16th inside the seam allowance and trim to this line for the neck edge and the sleeve if you are making a sleeveless sloper. I recommend that you not make a sleeveless sloper as you will miss the fitting of the sleeve which can completely change the fit and mobility of a garment. We are not statues so even with impeccable fit we still must most likely drive a car or pick up a child. I also recommend that your sloper have a jewel neckline so that you can get a good fit on the upper back. The jewel neck sloper can be used for collared shirts and blouses as well as any jacket that has lapels.
Tuesday, October 18, 2011
One pattern many versions
I have just completed six tops from one pattern. The pattern was developed from an armscye princess sloper I had fitted earlier in the year. I have made several tops from this sloper and am working on more. Fitting is one of the most time consuming, arduous and challenging aspects of sewing for most home sewing enthusiasts. My mantra is fit once, change the style. A top becomes a T shirt or a jacket by changing the ease. It becomes a vest by increasing the armscye slightly or a sleeveless top by decreasing the armscye so the under arm side seam covers the bra. The style changes to a drape front, a wrap, a cowl neck or ruffled blouse with a few modifications to the neckline and center front.
The teal blue top was made into a cowl neckline by extending the center front neckline above the shoulder seam about 6 inches. It was cut on the fold and the additional fabric drops down inside the front at center front. This fabric is a rayon jersey from Fabric.com
A big ruffled colar was grafted from an Ana Sui Vogue pattern an added to the gray charmeuse. I use this rule for ruffles...The diameter of the inside circle or circles must equal distance of the neckline where the ruffle will be attached. I raised the neckline 3/4 " on the v neck of the vest and added some additional ease since the charmeuse does not like to be too fitted on me. This top has six or eight seams if I add a center back seam. An eight of an inch ads 1 1/2" to 2" in total circumference. The gray charmeuse is from Cleaner Depot in Norcross, Georgia.
The blue drape front was done earlier in the summer and the photo shows that I just used my hip rule to add to a nice curve to the center front seam from about waist high up to just above the shoulder seam level. This fabric was 45" wide so the drape was just below the waist. This fabric is an Expo purchase from Vogue Fabrics.
The multi animal print drape front was done the same way except the fabric was about 58" wide. I used the same hip rule as it give a nice curve but the drape was wider as I used the full width of the fabric. I placed the center front piece near the fold and cut to near the edge of the fabric. The fabric is a Joann from their "as seen in Vogue Pattern Magazine collection." It is a poly sheer and I loved the print but it behaved badly. I tried a baby hem but I did not like the outcome and I ended up doing a hand rolled hem. I am looking for a silk chiffon animal print to try this again.
The black/red is ITY jersey knit purchased from Anne St Claire at Needlenook Fabrics. She did a bra program in Columbus Georgia recently and I had to have this fabric. Anne also had a nice selection of fold over elastic which I used to finish the neckline. I also found at the store there an eyelet punch and bundles of great ribbons and threads to use for embellishments. This fabric has pretty much 100% stretch in both directions. This required that I interface the neckline with fusible tricot and measured the placement of the holes from center front using my french curve for even placement. I wove the red ribbon through the holes and tied it at center front. I found that this is very stretchy and unstable while sewing. The armscye and sleeves relaxed after being stitched to give some puckering. The fusible tricot worked really well on the neckline so I fused 1inch bias strips of the fusible tricot to the armscye from notch to notch and also the sleeve cap. This gave enough stability for the armscy to remain stable and the sleeve caps to ease nicely. The fabic is also somewhat see through so it requires a lining or an appropriate undergarment. I am making a matching bra to go with my top. Anne sells her knits in two yard kits with the matching thread which is enough to make the top and enough scraps for the bra.


I have found that the last several items that I have sewn have been from fabric purchased right before I used it....hmmmm About that stash.
The teal blue top was made into a cowl neckline by extending the center front neckline above the shoulder seam about 6 inches. It was cut on the fold and the additional fabric drops down inside the front at center front. This fabric is a rayon jersey from Fabric.com
A big ruffled colar was grafted from an Ana Sui Vogue pattern an added to the gray charmeuse. I use this rule for ruffles...The diameter of the inside circle or circles must equal distance of the neckline where the ruffle will be attached. I raised the neckline 3/4 " on the v neck of the vest and added some additional ease since the charmeuse does not like to be too fitted on me. This top has six or eight seams if I add a center back seam. An eight of an inch ads 1 1/2" to 2" in total circumference. The gray charmeuse is from Cleaner Depot in Norcross, Georgia.
The blue drape front was done earlier in the summer and the photo shows that I just used my hip rule to add to a nice curve to the center front seam from about waist high up to just above the shoulder seam level. This fabric was 45" wide so the drape was just below the waist. This fabric is an Expo purchase from Vogue Fabrics.
The multi animal print drape front was done the same way except the fabric was about 58" wide. I used the same hip rule as it give a nice curve but the drape was wider as I used the full width of the fabric. I placed the center front piece near the fold and cut to near the edge of the fabric. The fabric is a Joann from their "as seen in Vogue Pattern Magazine collection." It is a poly sheer and I loved the print but it behaved badly. I tried a baby hem but I did not like the outcome and I ended up doing a hand rolled hem. I am looking for a silk chiffon animal print to try this again.
The black/red is ITY jersey knit purchased from Anne St Claire at Needlenook Fabrics. She did a bra program in Columbus Georgia recently and I had to have this fabric. Anne also had a nice selection of fold over elastic which I used to finish the neckline. I also found at the store there an eyelet punch and bundles of great ribbons and threads to use for embellishments. This fabric has pretty much 100% stretch in both directions. This required that I interface the neckline with fusible tricot and measured the placement of the holes from center front using my french curve for even placement. I wove the red ribbon through the holes and tied it at center front. I found that this is very stretchy and unstable while sewing. The armscye and sleeves relaxed after being stitched to give some puckering. The fusible tricot worked really well on the neckline so I fused 1inch bias strips of the fusible tricot to the armscye from notch to notch and also the sleeve cap. This gave enough stability for the armscy to remain stable and the sleeve caps to ease nicely. The fabic is also somewhat see through so it requires a lining or an appropriate undergarment. I am making a matching bra to go with my top. Anne sells her knits in two yard kits with the matching thread which is enough to make the top and enough scraps for the bra.


I have found that the last several items that I have sewn have been from fabric purchased right before I used it....hmmmm About that stash.
Wednesday, August 31, 2011
rain coat and Isabel's jacket
Finally camera and computer are speaking again.
Isabel's jacket is McCalls 5921. I added the front button tabs and the back belt. The yokes were on bias one layer. I added a back layer cut on grain for stability. The black and white zebra print is cotton pique from Hancock's selected by the designer (Isabel) and the trim is cotton sateen from Mary Jo's. Also selected by the designer (Isabel).


 The raincoat is laminated linen from Linda Lee at Sewing Workshop. The pattern is Vogue Sandra Betzina 1097. I auditioned 3 patterns before selecting this one. I wanted to use a trench coat pattern but when I started to work with the pattern I realized that a sleeve would not ease into the armscye. This pattern has a raglan sleeve with no ease. I tested every step before use. I tested the fusible interfacing and the melting of the glue process permanently discolored the fabric. I used rayon twill tape to stabilize the front and neck edges since the fabric was very stiff anyway. The laminate softens while you are working with it so you have to feed it carefully and sew slowly. In order to get the seams to lay acceptably flat they were stitched, pressed flat with a cool iron on silk setting, finger pressed open and then edge stitched and top stitched in a faux flat feld. The sewing was not difficult but somewhat arduous. The finished garment is heavy and very warm so I am looking forward to a cold and rainy day to wear it.
Isabel's jacket is McCalls 5921. I added the front button tabs and the back belt. The yokes were on bias one layer. I added a back layer cut on grain for stability. The black and white zebra print is cotton pique from Hancock's selected by the designer (Isabel) and the trim is cotton sateen from Mary Jo's. Also selected by the designer (Isabel).


Wednesday, June 22, 2011
Inspired by Balenciaga etc.
My friend Ruta shared her program book from the Balenciaga exhibit. I was so intrigued with the hand stitched (embroideried) buttonholes on the black silk ottoman coat. I am trying to make some that are similar. I have a top that is ready for buttonholes and I would love to add these to the top.
My seven year old granddaughter has been with me this week and with me she watched intently the jeans fitting webcast by Peggy Sagers. She is inspired for Nana to fit her a pair of jeans. That will be an upcoming project. I got some great denim from Peggy at Expo and she has some on hand now. It is a great weight and is 100% cotton. Finding a great weight in denim is challenging. If you need or want denim you may want to order some now.
I just got some laminated linen for a trench coat from Linda Lee at sewing workshop....I can't wait to get started on that project.
My seven year old granddaughter has been with me this week and with me she watched intently the jeans fitting webcast by Peggy Sagers. She is inspired for Nana to fit her a pair of jeans. That will be an upcoming project. I got some great denim from Peggy at Expo and she has some on hand now. It is a great weight and is 100% cotton. Finding a great weight in denim is challenging. If you need or want denim you may want to order some now.
I just got some laminated linen for a trench coat from Linda Lee at sewing workshop....I can't wait to get started on that project.
sewing with sheers
I have been working on a program for Sew Far West on sewing with silk chiffon and silk charmeuse. I spent some time testing some formulations of starch to give more body to the chiffon and the charmeuse. I am still working on the organza shirt/jacket. I am trouble shooting my camera as it is being stubborn about uploading the current pics. I will post the pics of the jacket when it is done.
This is the hand out that I used for the program:
This is the hand out that I used for the program:
I use liquid starch ratio of 3 parts water to one part of the bottled liquid starch. Saturate the charmeuse in the mixture, squeeze gently to remove the excess liquid and roll gently in a towel to absorb enough so it does not drip. Hang to dry. Press the fabric prior to cutting.
For the Charmeuse this usually provides enough body so that it can be cut and sewn without squirming all over. Be sure to use really sharp shears or a new rotary cutter blade. When the garment is completed wash it in silk wash or nutregena shampoo, rinse thoroughly, gently squeeze out the excess water and gently roll in a towel. Hang to dry and press when nearly dry.
The chiffon needs more help for cutting. I used the Niagra liquid starch undiluted. I use tissue paper, regular tissue paper from the wrapping paper section under the fabric and on top. I pin the tissue paper to the fabric in seam allowance areas and pin the pattern on top of the top tissue paper, pinning in the seam allowances. The starch gives it enough body to make the sewing much easier.
Test the starch procedure on a small sample to test the dye. If the dye runs then you will need to launder the piece and use white vinegar in the wash to set the dye.
If you have a heavily embroidered piece with intense colors you can rub a white 100% cotton or linen cloth on the back of the fabric to see if the dye will run. Generally the embroidered pieces have sufficient body however you may need to use the tissue paper under and on top of the fabric to cut.
Use a new size 60 or 65 sharp needle and silk thread if you can find it. Use a straight stitch needle plate or place a piece of tape or paper over the needle hole and let the needle make a hole in it. This is to prevent the fabric stuffing down the needle hole. You can try to move the needle to the farthest left position to see if this works.
I recommend a french seam for both fabrics. Sew a 1/4” seam allowance with the wrong sides together, with a 2.0 or 2.5 length stitch. Press the seam flat from both sides. Trim the seam right next to the stitching, press to one side, turn the piece so right sides are together and push the inside seam to the edge with your fingers, press firmly with small amounts of steam. Stitch right sides together with 1/4” seam allowance.
Silk charmeuse is somewhat fragile so you may want to add a small amount of additional ease to keep from stressing the fabric at the armscye and under arm seams.
Polyester behaves differently so you will have to test the fabric to see if you need to use these procedures on poly charmeuse and poly chiffon.
The other sheer that we see often in ready to wear is stretch tulle. Some of it has little stretch and is used to line the sheer jersey burnouts. It does not ravel, is nearly always shown unhemed with the edges raw. It is used as trim on t-shirts and knit skirts.
Cotton voile may also benefit from some starch. I wash and iron my fabric before I start to sew. If you need to starch soak it in a dilution of liquid starch. Spray starch will be applied unevenly and you may end up with an unstarched area just where you want to cut accurately.
Bias strips of all of these can be used for interesting trims around necklines, yokes or sleeves or up and down the front of a blouse or skirt. Bias strips can be ruffled and they make interesting trim as well. A 5 or 6 inch strip of bias or straight of grain can be doubled and ruffled to have a finished ruffle to add to sleeves or hems on pants or skirts.
Ready to wear has lots of chiffon flowers that are cut on the bias and edges left raw. Look at the trims and embellishments on line or in the stores to get ideas of where to use these as trim. Silk chiffon or charmeuse makes great scarves for yourself or for gifts.
Silk organza is fairly stable. I recommend to either pin a lot when laying out the pattern or use lots of weights when cutting. If you find that it is shifting it can also benefit from some starch. Because there is such a variance in quality of silks work with yours to see if it needs to be more stable.
I have used strips of tissue paper to sew chiffon and find that pulling the paper away disrupts the stitching. My opinion is that starch is a better option.
I use sharp needles sizes 60/7, or 65/7 for chiffon and 70/10 or 75/11 for charmeuse. Use new needles and if you hear a noise when the needle goes into the fabric replace it. A needle with a burr or damaged can cause a run in silk. Because silk is graded by weight it has a high amount of tin. This is really hard on needles so be prepared with a supply of needles in the correct sizes as they get damaged pretty soon.
Happy sewing and do not be afraid of the sheers.
Prepared by Deanne Smith 6/13/2011
Sunday, May 22, 2011
fit of new bras
In Anne St Clair's book she recommends to wash the bra two to three times before you decide it does not fit. I made one a size larger than the initial size and thought the cup was too big when I finished it. After two washings it now is a very good fit. Let me know if you have any issues with the way your bras fit. I have spoken to Anne several times with my personal fitting issues and she is very helpful.


 I have not purchased a bra since 2006 and have been very pleased with the the bras that I have sewn.


Subscribe to:
Posts (Atom)