Thursday, August 16, 2012
Developing Master Pattern: Ruched side front
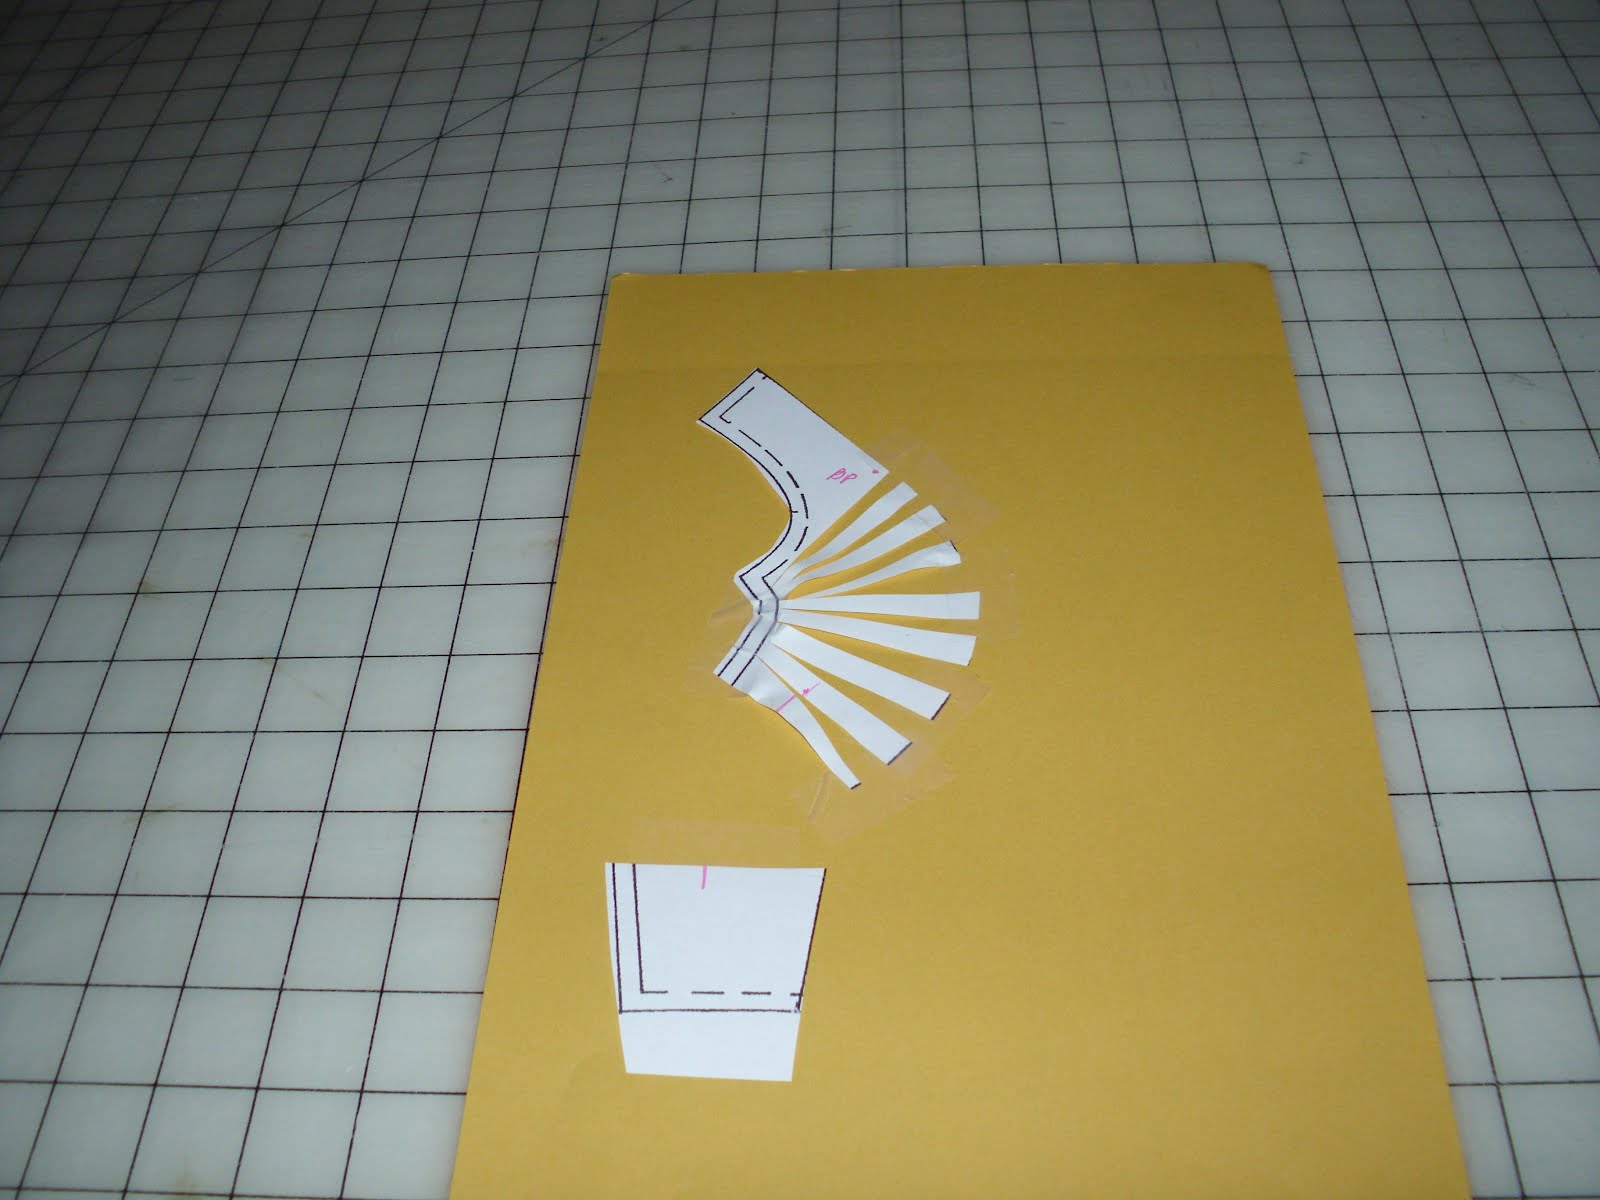
The photo of the half scale demonstrates how to slash and spread your side front princess pattern to get the ruching.


ruched side front on shoulder seam princess dress
In our Master Pattern class yesterday Geannene had a pattern for a dress with a ruched side front. My recommendation is that Geannene use her side front and slash and spread to achieve the same result. I have used the half scale bodice and cut it to make it a shoulder seam princess line. I made several cuts to but not through the side seam and pulled the inside seam line apart to form a curve. This is how the ruched side front pattern was made. I have attached a scan of the piece that I made.
Geannene, I recommend that you do this rather than trying to fit the other pattern. The more cuts that you make and spread the more curve you will get and the more ruching you will have. The general principal for gathers, ruffles and ruching is a ratio of 1 1/2 to 1. In other words if the part of your pattern that you want to ruch is 6 inches you may want to start with the circumference of the curved part at 9 inches. You can check the pattern that you brought today and measure the front piece where the ruching is eased into on the front and measure the ruching circle. This will give you the ratio that the pattern company used. I would then use this ratio on your top as well.
You all are the designers now and can make details or add details..I am impressed with the work that you all have done and the progress that you have made. I will look at my several pattern drafting books to recommend some that show how to draft details like collars, ruching, necklines, yokes, etc. Connie Crawfords book is good and so is Helen Joseph Armstrong. There are several less technical books on the market to and I will look through my collection to see which I have and you can take a look at them.
Wednesday, August 8, 2012
Get Fitted: Blouse or Top Sloper Instructions
Sloper Instructions
It is essential to mark and sew accurately to get an acceptable fit. This is a procedure to get the sloper well fitted. Be cautious not to over fit. You are not a statue. Movement, posture, fatigue, rest, shoes and under garments can all impact the fit. The sloper pattern must at least equal your full circumference at the fullest part of your body.
I recommend Connie Crawford blouse fitting pattern number 1201. It is available on
her website: www.fashionpatterns.com. It comes in 2 groups of missy sizes and 2
groups of plus sizes that correspond to bra cup sizes. Choose the pattern that includes your size and your bra cup size. Another advantage is that it is not just a bodice but goes down to the hip level.
Measure all the way around your body at the fullest part of your bust. Write this number down here: (a)________________ Measure across the front of your body across the fullest part of your bust from side seam to side seam. Write this number here:
(b)__________ Divide this number by 2. Write this number here: (c)____________.
Choose a pattern size that is equal to your side seam to side seam measurements across the fullest part of your bust. Measure the pattern pieces to determine the width across the bust. Write that number here: (d) _____________ On the pattern mark the seam line on the side seam at the bust line and measure from there to the center front line. This number is 1/2 of the distance across the front from side seam to side seam and should equal the number (c). (d) should equal (c). Now subtract (b)
from (a). Write this number here (e) __________. This will be your back
measurement. Divide this number by 2. Write that number here: (f)______________.
Measure the back pattern piece at the line that corresponds to where you took the full body measurement. Write that number here (g)____________. This should equal (f). cut a center back seam as this will be needed in the fitting the upper back.
If you have a very full bust or a muscular and wide back it is possible that you will need different sized front and back pieces. Please let me know and I will advise you
regarding the armscye and sleeve. You will cut the larger armscye on the larger piece
and the smaller armscye on the smaller piece. You will cut the sleeve corresponding to the size that you cut on each piece and blend the sleeve at the top of the sleeve cap.
Sewing the muslin sloper
The muslin must be sewn accurately to determine the fit. Press your muslin fabric prior to cutting. The next step is to mark all seamlines on your muslin pieces. Staystitch the neckline, shoulders and the armscyes. Stitch from the wide to the narrow so that you can cause minimum stretching of these seam lines. Press the staystitched muslin pieces. Then compare the neckline, shoulder and armscye with the pattern to determine if there is any distortion. If so correct it by steaming the piece back into shape or marking the correct seamline onto the pieces so it can be sewn accurately. After stitching the seams press them flat then open. Cut 2 inch seam allowances on the shoulders. Stitch these on the outside. You will be stitching wrong sides together at the shoulders. Cut one inch seam allowances on all other seams. If using Connie's pattern cut as shown on the pattern pieces. Set both sleeves as you would in a garment. Add a center front zipper.
It is possible that you will need an upper back adjustment which is then made from the stitched muslin. This adjustment may require the assistance of a sewing friend. If the back neckline does not sit at the base of the neck slash 1 inch from neck seamline from center back to but not through the back armscye seam. The muslin fabric will spread the amount needed. Measure this at center back and over the shoulder blades. On the paper pattern make slashes every 1/4 inch and spread 1/8 to 1/4 inch until you have added the full amount needed from the muslin.
Sunday, July 8, 2012
Developing Master Patterns supplies list
Supplies needed:
24 inch by 30 yards architects “trash” paper, several very sharp number 2 pencils,
plastic see through dressmaker curve (available from Peggy Sagers ot Dritz), 18” or 24”
flexible ruler, L-square or T-square, hip rule is not imperative but very useful, enough “muslin” yardage to make your garment twice. (Muslin is for class 101).
Large 3 ring binder for notes and records of each garment.
The goal is that you will have several completed garments that fit. Most importantly, that you will acquire the knowledge, information and confidence to analyze patterns and use your own master patterns to achieve perfect fit and/or add the details to your own master patterns.
Developing Master Patterns Elements of Design Part 2
PART 2 MORE (advanced) DESIGN
Part 3.5 Copying details
Part 3.6 Adding details
Part 3.8 Moving darts
Part 3.9 The elements of your personal preference
Part 3.10 Adding construction details
Developing Master Patterns Elements of Design Part 1
PART I ELEMENTS OF DESIGN
Part 3.1 Design analysis and comparing patterns
Part 3.2 Incorporating design details
Part 3.3 Necklines
Part 3..4 Fronts
Developing Master Patterns Class 202
Developing master patterns or slopers from your fitted top or blouse.
Part 2.1: Tweaking and making pattern changes.
Making and using templates.
Part 2.2: Developing other master patterns from the fitted final pattern above.
Part 2.3 Developing and adjusting the sleeves:
Part 2.4 Developing basic patterns to your personal preference.
Developing Master Patterns Fitting Class 101
Pattern Fitting and Tweaking Program for tops and blouses
Use your tried and true pattern or start with a new basic pattern*
Lesson 1: Complete and accurate measurements.
Pattern analysis and comparing your measurements to pattern
measurements
Lesson 2: Pattern revisions for your body.
Lesson 3: Finish sewing muslin garment, noting any fitting tweak.
Note: Prior to beginning this I strongly recommend that you invest in a well fitting bra.
Anne St Claire at Needle Nook Fabrics has info on what makes a well fitting bra in her
book Intimately Yours, Bras That Fit. Her contact is ndlnookfab@aol.com. You could
also have a commercial bra professionally fitted.
*Contact instructor regarding pattern selection.
Working hard on fitting
The Developing Master Patterns class has been working hard on preparations. We have been fitting. We have found good success with Connie Crawford's new bust dart blouse fitting pattern (available from her website: fashionpatterns.com). It has been formulated on a more realistic view of the human body than the "B-Cup Barbie-esque" view of some other patterns. Fitting is a process that has to be worked through. It starts at the top and then when one change is made it can require other changes as well. If you are doing your own sloper without a helper be sure to cut, mark and stitch accurately. Be sure to stay stitch following the grainline around the curved edges that you do not want to ease. A tip from Cynthia Guffey is to staystitch 1/16th inside the seam allowance and trim to this line for the neck edge and the sleeve if you are making a sleeveless sloper. I recommend that you not make a sleeveless sloper as you will miss the fitting of the sleeve which can completely change the fit and mobility of a garment. We are not statues so even with impeccable fit we still must most likely drive a car or pick up a child. I also recommend that your sloper have a jewel neckline so that you can get a good fit on the upper back. The jewel neck sloper can be used for collared shirts and blouses as well as any jacket that has lapels.
Subscribe to:
Comments (Atom)